Sesame, Almond and Potato Koftas

Sesame Almond and Potato Koftas

YOU NEED

3 small to medium potatoes (approximately 450 grams), any type that is good for mashing

¼ teaspoon ground cumin

¼ teaspoon ground cardamom

¼ cup of fresh coriander, washed, drained and finely chopped

½  teaspoon of salt

2-3 tablespoons of quinoa flour

3- 4 tablespoons of Bonsoy soy milk

½ -¾ cup of crushed almonds

1 – 2 tablespoons of sesame seeds


YOU DO

Wash the potatoes, spike them with a fork and microwave them till they are tender. Once they are cooked, cut them in half and carefully scoop the flesh out. Place the flesh into a bowl and discard the skins.

Add the cumin, cardamom, coriander and salt to the potato and roughly mash everything together with a fork.  Check the seasoning and form the mash into koftas.

Put the flour on a small plate and the milk into a small dish. Mix the crushed almonds with the sesame seeds. Very gently roll one of the balls through the flour. Then sit it on a fork and dip it in the milk.  Carefully roll it in the nuts, until it is well covered and place onto a small oven tray. # I tend to use one hand for the flour and milk and one for rolling them in the nuts, so that the nuts don’t get too wet. Repeat until all the koftas are coated.

Place them in a preheated oven (180c). Bake for 20-30 minutes or until they are browned.

Serve them hot, accompanied with relish, coconut yoghurt and a squeeze of lemon juice.


Yields: 12 koftas. Will vary slightly depending on the size of the potatoes you used.

Time: 15-20 minutes of preparation.  30 – 35 minutes cooking time. This will vary depending on the strength/type of your microwave and oven.

Notes: Don’t worry if they weigh a little more or less than 450 grams. This will not make a huge difference.

If you don’t wish to microwave the potatoes, you can bake them. This will take about 40 minutes though.

The smaller the crushed nuts are, the easier they will stick to the koftas. You want them to have some crunch once cooked though, so leave them with a bit of texture still. I crush the almonds in a mortar and pestle, a few at a time.

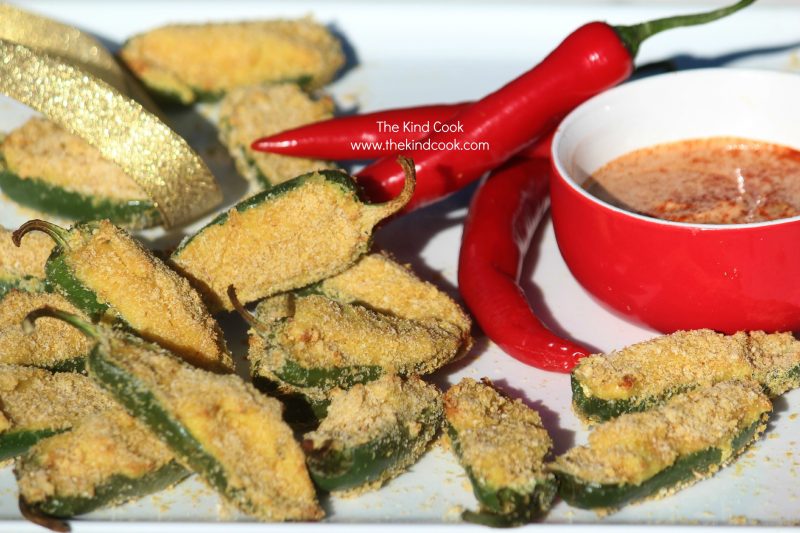
Cashew Cheese Stuffed Jalapeño Poppers with a Smoked Paprika Sauce

cashewchillipoppersIMG_6305wm

YOU NEED

For the cashew cheese

1 cup of raw cashews

3 teaspoons of nutritional yeast

½ teaspoon of garlic powder

1 teaspoon of onion powder

3/4 teaspoon of salt

¼ teaspoon of turmeric

4 tablespoons of water

2 tablespoons of fresh lemon juice

12 fresh jalapeños

For the crumbing

¼ cup of gluten free bread crumbs

3 tablespoons of nutritional yeast

¼ cup of almond milk (or a plant based milk of your choice)


For the dipping sauce

1/3 cup of raw cashews

½ teaspoon of salt

1 teaspoon of smoked paprika

5 tablespoons of water


YOU DO

Soak the 1 cup of cashews and the ¼ cup of cashews over night, in separate containers with enough water to cover them. Once soaked, drain the water from the 1 cup of cashews and discard the water.

Preheat your oven to 200c and make the cashew cheese by placing all the popper ingredients (except the jalapeños), into a blender and blending for 5 minutes. Make sure you scrape any lumps from the side of the blender and add them to your mixture so that they blend nicely too. Once the cashew cheese is smooth, set it aside.


Slice each jalapeño in half. Remove and discard the seeds. Put a generous teaspoon of the cashew cheese mixture into each jalapeño half and set aside.

To make the crumbing mixture, combine the bread crumbs and nutritional yeast and place them onto a plate. Pour the milk into a small shallow bowl. Carefully dip the stuffed poppers into the almond milk. Place them onto the breadcrumb plate and cover them generously with crumbs. Shake off any excess crumbs. Repeat until each popper is well covered. The bottom half will only have a thin layer of breadcrumbs, but the cheese stuffed top will have a nice thick layer. Place the poppers onto a dry baking tray and into the oven. Cook for 15 minutes until the jalapeños have softened and the bread crumbs have browned.

While the poppers are cooking, make the sauce. Drain the remaining 1/3 cup of cashews and discard the water. Blend the cashews with the rest of the sauce ingredients, for 5 minutes until smooth. Place the sauce into a serving dish.

Once the poppers are cooked, place them onto a platter, with the sauce and serve immediately.


Yields: Makes 24 poppers.

Time: 30 minutes to prepare and 15 minutes to cook. Plus the soaking time for the cashews.

Cucumber and Cream Cheese Sandwiches

cucumberIMG_8554wm

Another super simple but always popular recipe. It’s great for an afternoon tea, for something easy, but a little bit fancy pants.


YOU NEED

1 large cucumber

1 tablespoon of fresh dill

½ tablespoon of fresh lemon juice

dairy free cream cheese

salt/pepper to taste

8  slices of fresh bread


YOU DO

Wash & dry the cucumber. Cut it into sections that are the same length as the bread. Then cut those sections into very thin slices. You need enough slices to have one layer of cucumber for each sandwich. Probably 2 slices per sandwich will be enough, depending on the width of the slices. Lay the cucumber slices onto draining paper and set aside while you prepare everything else. Put any leftover cucumber aside for another recipe.

Wash and dry the dill. Finely chop it and mix the dill and lemon juice through the cream cheese and then season with salt and pepper

Trim the crusts from the bread and set them aside for another recipe.

Lay 2 slices of bread onto your bench and liberally spread them with the cream cheese mixture.

Place 1 layer of cucumber onto 1 of the slices, until all the cream cheese is covered and put the 2nd slice of bread on top, with the cream cheese facing down onto the cucumber.

Cut the sandwich into 3 even rectangle finger sandwiches and put them on a plate. Repeat until all your finger sandwiches are made and serve.

If you are not serving straight away, cover the sandwiches with cling film and refrigerate. Use in the same day though.


Yields: 12 finger sandwiches

Time: 15 minutes

Notes: Giving the cucumber time to sit on some draining paper is a really important step because otherwise you will end up with very soggy sandwiches.

You can get dairy free cream cheese in the supermarket, where the dairy cream cheese is.

Cheesy Cauliflower Fritters


I loved the pakoras I made recently and they have been such a hit so I wanted to play with some similar ideas with some other vegetables.  After a couple of experiments I got to cauliflower but I felt more like a cheesy type fritter than a heavily curried, garlic and herb infused batter, so I skipped all those ingredients this time around and just used a couple of more mild flavours, some nutritional yeast and coated the cauliflower lighter in the batter.

This is another great one for a cold Sunday afternoon snack or for lunch on flat bread with hummus and salad or for a party.


YOU NEED

1/4 cauliflower head

1 cup chickpea flour (also known as besan flour or garbanzo flour)

water ( I have not given an amount because the amount varies between flours)

1 teaspoon of onion powder

5 tablespoons nutritional yeast (this is what makes it taste cheesy). I get my nutritional yeast from my organic grocer, from health food stores and online.

1 long red chilli, halved, seeded and finely sliced

1 teaspoon of salt

oil for frying (I use safflour or rice bran for frying)

extra salt for garnish


YOU DO

Heat a small pot of oil. I highly recommend getting a thermometer. You can pick them up for $20-$30. I judge the heat by look and experience but if you are unsure you will always know you have your oil at the right temperature. I also test the oil by throwing a tiny piece of bread into the oil when I think it’s ready and if the bread goes straight to the top and sizzles, the oil is hot enough.

While the oil is heating mix all the ingredients, except for the cauliflower in a large bowl until well combined and you have a thick batter. Just add water very slowly until you reach a thick batter. It needs to be thick though.

Cut the cauliflower into thin slices. You will find you will end up with some lovely complete slices of cauliflower and lots of smaller bits.

Put the cauliflower into the batter and mix well. The cauliflower will have a thin coating of batter. Enough for a crunch once fried.

Carefully place the cauliflower pieces, a few at a time into the oil and fry till golden brown. Place onto draining paper and season again with salt while the oil is still hot.

Serve immediately.


Serves: Yields a good amount but actual fritter pieces is always going to vary depending on how you cut the cauliflower. This quantity makes enough for half a dozen people to snack on along with other nibbles.

Time: This took me about 20 minutes

Freeze: Not suitable.

Cabbage Pakora


YOU NEED

½ cup of green cabbage, finely shredded.

½ cup of  red cabbage, finely shredded

1 cup of chickpea flour (aka besan flour or garbanzo flour)

1 tablespoon of curry powder (I use Clive of India)

1 teaspoon of onion powder

1 -2 cloves of garlic, peeled and minced

½ teaspoon of fresh minced ginger

3/4 cup coriander, washed, drained and roughly chopped

1 red bullet chilli, deseeded and finely sliced

water

1/2 teaspoon of salt


YOU DO

Heat a medium pan of oil on the stove top until it is hot enough for deep frying.

Put the curry powder in a dry pan and dry roast it on a low to medium heat for a couple of minutes, then put it in a large bowl.

Sauté the ginger and garlic in the same pan in small amount of oil for a minute or 2 and put in the bowl with the ginger.

Add the chickpea flour, onion powder, chilli, coriander and salt into the bowl with the garlic and ginger mix. Add  the water and stir well to combine. Then keep adding water a little at a time until the batter is thick but you can still whisk it. You don’t want a runny batter.

Add the cabbage to the batter and mix them until they are well combined.

Using a tablespoon pick up blobs of the batter and place carefully in the oil until golden brown. Repeat until all the batter is gone. Place on draining paper and serve. I like to serve them straight away.

Serve as a starter or a snack or with steamed rice and loads of fresh raw salad and your favourite dipping sauce.


 Servings: Makes 10 plus pakoras.

Time: Takes about 2o minutes

Freezing: Not suitable.

Indian Spiced Swede Patties


YOU NEED

1 swede, peeled, cut into cubes and steamed or boiled until tender

2 large cloves of garlic, peeled and minced

1 small brown onion, peeled and finely diced

1 cup breadcrumbs (use gluten free breadcrumbs if you wish)

1 teaspoon of ground cumin

1 teaspoon of ground turmeric

1 teaspoon of ground coriander

¼ teaspoon of dried chilli flakes

1 bunch of fresh coriander, washed and roughly chopped.

salt/pepper to taste


YOU DO

Sauté the onion in a small pan, on low heat with some oil until softened. Add the garlic and cook another couple of minutes.

Add the cumin, ground coriander, turmeric and chilli flakes and cook for a further couple of minutes.

Mash the cooked swede. Add the onion and spices. Add the bread crumbs, the coriander and season.

Form small patties with the mixture. Then cook in a pan with a little heated oil for a few minutes on each side. Pop them in a pre heated oven for another 10-15 minutes to really cook them through also if you wish.

Serve with rice and salad or with relish and rocket in a pita pocket.


Servings: Made 8 small patties

Time: This all took me less than 30 mins.

Daikon Patties

I had never in all my years of cooking, made anything with daikon, but someone asked me on The Kind Cook Facebook page about it. It got the little wheels in my head churning and then the other day I was at my organic grocers and I spotted a daikon.
I just threw in a bit of this and a bit of that, so you may want to change some of the ingredients. But I just went with Asian flavours that I thought would complement the daikon. I also wanted texture and crunch which is why I added the nuts.
I also really wanted little chunky patties. This meant the middle warmed through but essentially remain uncooked. Daikon can be eaten raw though, so I have no concerns there and the outside has texture. I guess if you flatten them if you wish to.
I didn’t think I would daikon, BUT I love these. It’s always cool to experiment with something new too. And the outcome was incredibly fragrant with the sesame oil and spring onions


YOU NEED

2 loose (ish) cups of daikon, peeled and grated

1/2 cup of spring onion aka “scallions”, washed and finely sliced

1 very generous teaspoon of sesame oil (mine over flowed by accident but turned out to be a nice amount)

3 teaspoons of sesame seeds

3 teaspoons of egg replacer, mixed well with 3 teaspoons of water until it forms a watery paste

1/2 teaspoon of ginger powder (I didn’t have any fresh on hand)

2 tablespoons of roasted and salted peanuts, crushed or roughly chopped

4 teaspoons of flour (I used red rice flour but use whatever is at hand and gluten free if that’s what you require)

1/2 cup of bread crumbs (always check the ingredients as most bread crumbs contain some dairy, eggs, fish etc)
oil for cooking

YOU DO
Once you have peeled and grated the daikon, place it on a plate and sprinkle a teaspoon of salt over the top. Leave it there while you collect and prepare all your other ingredients.

Once you have all your other ingredients washed, chopped and ready to go, throw them all into a large bowl.

Then go back to you daikon plate and grab handfuls of the daikon and squeeze all the water out of it. You want it to be as dry as possible. Once you have done that just throw it into the bowl with all the other ingredients.

Combine all the ingredients together and form into small balls, then flatten slightly into patties.

Press each patty down into the bread crumbs. Repeat for the other side.

Heat some oil in a large pan and cook the patties for a few minutes on each side until they are a golden brown.

Serve immediately with chilli and or tamari.

Yields: 8 small patties

Time: 30 mins

Freezing: Not suitable.

Black Sticky Rice & Mushroom Gyozo

As with most of my recipes, they begin with something I need to use up. Today it was mushrooms.

I started out with the intention of making a mushroom soup but felt inspired to find a use for some black sticky rice I recently purchased. I also was curious to make gyozo for the 1st time.

It was so much easier than I had imagined. I hope you give it a shot.


YOU NEED

1 packet of round dumpling skins. (You won’t need them all)

1/3 cup of black glutinous rice, rinse well then cook in plenty of boiled water until tender. (The packet didn’t have instructions in English but mine took about 30-40 minutes.)

2/3 of a cup of water chestnuts, washed, chopped into small dice

2/3 cup of spring onion, washed and finely sliced

2 large cloves of garlic, peeled and minced

1 teaspoon of minced ginger

1 small brown onion, peeled and finely diced

1/2 teaspoon of fresh red chilli, finely diced with seeds and all

1 cup of mushrooms roughly chopped into small bits. #I used field mushrooms, as that is what was in the fridge

1 teaspoon salt

oil for cooking


YOU DO

While your rice is cooking, heat some oil in a pan, turn down to a medium heat and cook the onion until it starts to colour, add the garlic and the ginger and continue cooking for a couple of minutes.

Add the chilli and the mushrooms and cook until the mushrooms have softened coloured and cooked right down.

Throw in the spring onions, water chestnuts and salt and cook for a another couple of minutes and set aside

Once the rice is cooked add it to the mushroom mix and stir well to combine.

Lay out your dumpling skins. Place approximately 1 teaspoon of mixture in the middle of each skin. DON’T be tempted to overfill them because you will tear the skins and/or struggle to seal them.

Wash your hands and get a small dish of cold tap water and place next to your dumpling rows. Wet your fingers with the water and dab you fingers around half the dumpling skin circle on the side furtherest away from you.

Doing 1 dumpling at a time, gently pick up the side closest to you and gently fold it over the top of the filling…folding away from you. Gently press the flat half moon side of the gyozo. Repeat this process untils all your dumpling skins are now little half moon gyozos.

Using a fork make small indentations on the flat part of the gyozo. This helps close the seal and also decorates it. As you finish your batches pop the aside on a spare bit of bench or plate and lay out your next batch.

Once all your gyozos are assembled, put a large non stick pan on the stove top and add approx a centimetres worth of water into it, along with a couple of tablespoons of olive oil and bring to the boil. Place your gyozos in batches (not touching) into the pan, flat side down and cover with a wok top.

Cook on high heat with top on for a few minutes, then remove the top and allow the water to evaporate. As the water gets lower turn the heat down to a simmer until all the water is gone. Check that your gyozo are not sticking. If they are just add a little more oil and continue cooking until almost all the water is almost gone and the bottom of your gyozo are coloured and put aside. Repeat this process in batches until all your gyozo are cooked.

You should end up with sticky, steamed tops and crunchy, coloured bottoms.

Serve immediately with soy sauce and sweet chilli sauce


Servings: Made approx 30. Maybe a couple more as I was testing them on the way 🙂

Time: Haven’t timed

Freezing: Perfect for freezing. I popped a lot in the freezer on a plate (not touching) and once frozen popped them in a sealed container for a quick dinner or snack for another day.